Saturday, 21 January 2012

Knitted Scarf

As anyone who lives in Canada, and maybe even the northern US states, can tell you, it has been an unseasonably warm winter.  Typically in Alberta, we get super cold (I mean -40˚ F & C) at this point in the year but due to this warm spell, I expect that we'll be paying for these barely above and below freezing temperatures in February.  So I'm looking at this time period as extra preperation time before the super cold hits.  So this week's project will be a knitted scarf!

I had made a few of these previously and believe me when I say I love them.  However, I'm a Jersey girl (please don't think I'm one of those 'Jersey Shore'-like people as only a small percentage of NJ people are like them) so if I'm going to keep warm, I am going to look good doing it, even if it means I have to make my own accessories.

Here are the two that I had made previously:
Justin's Scarf

My original scarf


Before I go into the tutorial, I do want to touch upon the idea of "You get what you pay for."  I have made scarves out of the cheap-o Walmart Special yarns (particularly the Red Heart Brand) and I find them scratchy and not the warmest, especially if you're trying to make something warm.  If you're going to make a garnment that you're going to wear, don't cheap out unless you're learning or experimenting.  If you want good quality, be prepared to spend the extra money.  My personal favorite yarn for projects like this is Lion Brand Yarn's Homespun yarn.  Using a thicker yarn will help keep the warmth times, it is exceptionally soft.

To start this project, you will the following:
  • Size 10 (6mm) knitting needles, I'd recommend using the 10" needles as opposed to the 14"
  • 2 yard skeins of yarn (make sure you get the same Dye lot number)
Instructions:

1.) Start out by casting on 20 stitches.  I'd recommend using the long tail cast-on method as it will blend in a bit better.  If you aren't sure how to do this kind of cast on, the best resource  (had the best pictures) that I found for this is knitty.com


2.) Use the garter stitch (knit every stitch on every row) and knit until you reach the desired length.  See the pictures below to learn how to knit for a right handed person.

3.) Once you reach the desired length, cast off.

4.) If you're someone who likes tassels, add them using a crocheting hook.


I only just finished it today so here is the final product!

I love the way it turned out but as I mentioned, if you're someone who likes tassels, they can easily be added.  Hopefully, the next project: a matching took (AKA: Hat) to go with this scarf.

Friday, 13 January 2012

Favorite Product: Evernote

Ever go to a craft store or fabric store to buy materials for your latest and greatest project and when you reach for the list, to your horror, you left it home?  I cannot tell people how often I've done that.  When I think I'm being cleaver and writing it all down (especially when I'm shopping for materials and supplies for multiple patterns) , of course, I end up not writing something correctly so I end up getting either the wrong thing or not getting it at all which means wasted gas going to and from the craft/fabric store.

All I can say is "Thank goodness for modern conveniences!"  Back in August I got my Android Galaxy S phone.  At first, I tried using the camera function on my phone but that didn't seem to work out as the numbers and words were always fuzzy.  Then Justin, my common-law husband, introduced me to a note taking app called "Evernote."  At first, I was sceptical of this program but then, I learnt (through experimentation of course) that I can attach PDFs into notes by scanning the envelopes and then putting them into notebooks via the Internet or even the app for your computer.  Evernote does require Internet access which most apps require these days (and most phone plans also include data plans as well).  It is available on most smart phones and tablets.

I have used it to store information on all of my 50+ sewing patterns including a scan on each backing of my pattern which I keep separated by pattern brand.  The screen shot below is how I use Evernote.

Screen Shot of my Evernote program.  To see a larger version of this, click on the picture.

I also typically put notes in each note such as the size (which I removed for the picture due to my own insecurities), colour fabric (if I have any ideas as to what I want), and any other notes which I want to make.  I also find this to be useful to keep track of my knitting needles, crocheting hooks, and even embroidery thread colours.

The nice thing about this program is that if you ever loose your phone or tablet, you don't have to worry about loosing all of your work as it is stored online and you can re-call it on any mobile device.  The wonders of modern technology!

Does anyone else use this program?  What else do you use it for?

Sunday, 8 January 2012

Knitted Bikini Top

I will admit flat out that I am a novice knitter.  I am 100% self taught and I do not pick up things from books or the internet easily.  So believe me when I say that I was shocked when I was able to find a knitting tutorial which was clear and easy to follow. 

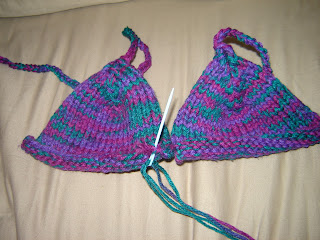
I had purled and knitted before but never in anything short of a scarf.  So here's how it turned out.
The bikini top on the bed
How the top looks on an actual human!

As you can see, it did not turn out badly at all.  I had found the tutorial on ThreadBangers (no, it's not any kind of bad porn site) and they had great instructions on how to make this in a video.  For those of you who do not have fast internet connections, here are written out instructions on how to make this bikini.

So here's what you need to make this project:
  • a Tailor's Tape Measure
  • size 10 (6.0mm) knitting needles
  • Size I-9 (5.50mm) crocheting hook
  • At LEAST one skein of yarn (two would make the project much easier but be prepared to have a lot of extra)
  • Scissors
  • one Yarn or Tapestry needle
ThreadBanger: How to Knit a Bikini Top

If you're not someone who can follow videos, here are the instructions written out:

1.) Measure under your breast to find the width.  Then use the following formula to figure out how many stitches to cast-on.
Width of the base of your breast X 4 = # of stitches to cast on

2.) Measure from the base of your breast to the nipple.  Then use the following formula to figure out how many rows to knit/purl.
Base of your breast to the nipple X 5 = # of rows to knit/purl

3.) Start out by using a long tail cast-on.  Use two ends of the yarn and hold them together.  You're going to treat the two strands as if they were one.  This will give you the correct knitting gage.  If you're not sure how to do do a long tail cast-on, knitty.com has the best tutorial with clear pictures to do this.

4.) Using the Stockinette stitch(Knit 1 row, purl 1 row, and repeat), knit the number of rows you calculated earlier.

5.) Count 10 stitches in and do a slip slip knit stitch.  Place a marker and do the next two stitches like that.  The marker will remind you that you need to do a slip slip knit stitch (two stitches done together) before and after the rings.  Do this until you have two stitches left.

6.) Leap frog the first stitch over the second.

7.) Use your crocheting hook to slip stitch a strap around your neck.

8.) Tie your two ends at the bottom of your bikini and begin using a slip stitch, make a strap to tie around your back.

9.) Repeat steps 3-8.

10.) Sew the two cups together and try on.
Again, I'd highly recommend this project.  If you're fairly new to knitting, I'd highly suggest this project just to help hone skills. Also, reminder, Valentine's Day is coming up fast so this may be that extra bit of spice for the bedroom if you don't want to spend $60 on that Victoria Secrets bra!

Hopefully I'll find bottoms to go with this!  Enjoy!

Oh, and one suggestion, if you have any kitty helpers, make sure they're not chewing on your yarn.  Don't let this picture fool you but I had to fight Taven (below) from eating my yarn.

Wednesday, 4 January 2012

DIY Pin Cushion from Recycled Materials and Fabric Scraps

Well, it's my first blog entry aside from my introduction.  Kind of scary but hey, you've got to start somewhere, right? 

Well, I suppose my first project I will post will be my favorite DIY pin cushion.  This is an easy thing to make and for those of you who do not sew, the good news is that you don't even have to!  Here's what the finished project looks like.


The things you will need are:
  • a recycled tin or can
  • Glue (you can use any that dries clear)
  • a strip of fabric that is long enough and tall enough to go around your tin or can
  • fiber fill (Preferably from an old stuffed animal or use that Christmas snow you're planning on throwing away)
  • flat block of styrofoam (optional but make sure that it only comes up half way up the can/tin)
  • something to cut the styrofoam with
  • a square of fabric which is about 2" larger than your can/tin
Instructions:

Step 1: The first step is to glue the fabric strip around your can or tin.  I used a small tin for this as I tend to put out all of my pins before I work.  If you don't have a strip of fabric.  You can use ribbon, duck tape, yarn, etc as well.  I do not have a picture of this step unfortunately.

Step 2: Press your can or tin down on the styrofoam and cut out the imprint of the circle.  I used a drywall saw to do this but a knife should work as well.  Then put the syrofoam circle into the tin/can.  This is optional if you do not have any.


Step 3: Put some fiber fill and any beeds of styrofoam into the can.  Don't worry about over stuffing it, in fact, go ahead and do so.  It will flatten out once you put the fabric over it.

Step 4: Put the fabric over the fiber fill and begin pushing the fabric square  into the sides of the can.  I used some scrap fabric that I had lying around.

Step 5: Use a pair of scissors to push the raw edges all the way down the sides of the can.  You want no fiber fill showing or any raw edges.

Step 6: Once you have all the raw edges hidden and have the fiber fill hidden, let the glue dry.

Once it is dry, it's all ready to use!


I found that this worked out well with a smaller cookie tin but even a tuna can will work for this project, just don't use the styrofoam.  As for the outside, you can use duck tape (they have some REALLY nice designs in Michaels Craft Stores for reasonable prices), ribbon, or even yarn if you wanted to take the time to wrap it.  If you're using a nice tin and you don't want to cover it, you don't even have to.

Another variation which I plan on doing is buying some magnets and gluing them to the bottom of the tin so that you can make pin pick up easier.  If you are afraid that the edges will come up, simply put some glue on the sides when you're stuffing the fabric into the sides.

Hope this inspires everyone to make some personalized stuff for your craft area!

Tuesday, 3 January 2012

Introduction

Well, this is my first crafting blog.  I'm not sure where to start so I suppose an introduction is a good place.

My name is Kimberly (Kim for short).  I am a real Jersey Girl living in Alberta, Canada.  I'm smart, down to earth, creative, and organized.  Although I do the traditional "girly crafts", I cannot describe myself as a girly person.

I live with my Canadian common-law husband, Justin.  Here is a picture of us.

Justin and I have happily been together for a while.  Although we are not married yet, we are working towards that step.  Besides, we need to save up for that sort of thing but first, a house of our own.  Yes, you read that right, we are trying to save up for a house of our own.

Together, we live with our three cats (Velcro, Riley, and Taven) and our dog (Ashrah).  Velcro and Riley were born under the shed of the neighbor of Justin's mother.  His mother took in the kittens and then ended up adopting their mother.  Justin decided to keep Velcro (appropriately named) and Riley.  I came into the relationship with Taven who came from a rescue situation and Ashrah who came from Prairie Animal Rescue Society. 

Taven, Velco, and Riley sleeping on our bed.

Me and Ashrah in a park in Camrose, AB


I enjoy sewing the most but I also knit and crochet.  My creativity doesn't just doesn't end there.  I refuse to stay with just one medium.  I also love to experiment with different mediums such as clay and embroidery thread.  Currently, I am learning how to cross stitch, embroider, and quilt.

Although I am not a professed "green person," I am not afraid to work with the idea of being green.  I enjoy a challenge and I have already jumped on a few green/recycled projects.  I plan on throwing a variety of different projects up here.  You should be able to find everything from things for dogs, cats, and humans.  I do not intend to focus on any one section.

I look forward to sharing my projects with everyone.  Enjoy!